
Getting ready for Christmas this year, I realized that my sister and I got our sewing machines from our parents last Christmas and we've had some good times over the last year. I wish I could say my sewing has advanced as much as my knitting did in Year 1 (when it was a full on, all-encompassing obsession), but I have made a few things I've been pretty happy with.
The newest is this little gift set I made for a February baby. I got some really great deals on flannel from Joann, so I looked up ideas for things to do with it. Chickpea Sewing Studio has this great tutorial for a blanket, changing pad, and washcloths and this tutorial for bibs, which were both awesome. I combined the directions from both and just kind of ran with it.
The whole little set contains a huge receiving blanket (flannel on both sides), two washcloths, a changing pad, and a bib (all flannel/terrycloth). I bought 3 yards of fabric and one yard of terrycloth. Even with my super-slow sewing skills, I finished it in an afternoon.
There was a fleece remnant at Joann that matched the green frogs in the flannel, so I decided to make a frog plushie to look like the frog head in the pattern. I free-handed a pattern on tracing paper to look like the frog head, then cut that out, pinned it to the fleece, and cut out two identical fleece pieces. I sewed them together right sides together leaving a small opening for stuffing, flipped it inside out, stuffed it, then ladder stitched the opening closed. Using felt from the craft store that is sticky on one side, I cut out shapes for the facial features and stuck them on the head. Ta da! Frog head plushie!
I gave it to the parents at a baby shower a few weekends back and they were pleased. They were even more pleased with the knitting I did for the little one, though- more on that later.
Hope your last minute holiday knitting is going well and is not stressing you out too much. I have one last project to finish up knitting-wise, but I think I have plenty of time to do it. Now just to wrap all the presents and clean the house and dang it I want to bake some sugar cookies too.
Monday, December 21, 2009
Flannel is awesome.


Wednesday, December 9, 2009
Quick Stuff
I've been MIA lately, but there actually is a little knitting going on. At least some knitting for little people. On the car ride to Nashville for Thanksgiving, I started working on a hat for a baby girl who is coming in January. I wanted to give a little gift to her Mom during the trip, so I was knitting fast.
Pattern: 10 Cable Baby Hat, my favorite newborn hat
Yarn: baby-pink Plymouth Encore Worsted
Needles: Size 8
I got the hat done in record time, so the night before Thanksgiving I started on some booties to match. I borrowed some antique buttons from Mema (grandmother-in-law extraordinaire) and had a little set ready to go. I made super-girly Mary Janes, which I've made before and love.
Pattern: Mary Jane Baby Booties
Needles: I think size 4s?
There is seaming involved in these booties, but it's not too bad. I think the back turned out pretty well- you can tell they are seamed, but it's not too noticeable.
Pretty cute set together, huh? I think everything together took about 5 hours or so.
It's that unfortunate time of year in the knitting world when the blogs are blank because no one wants to show off their holiday knitting too soon. I'm no different- I'm exclusively working on holiday knitting now, but I do have a few FOs waiting. I'll try to get those blogged soon!


Sunday, September 20, 2009
Sunday Late Night
I'm sitting here in my pajamas (which, yes, is exactly what I was wearing when I got out of bed this morning) and wanted to get a quick post in to make me feel like my day hasn't been a total waste. Not that watching four hours of RuPaul's Drag Race and all 17 hours of the Emmy coverage is a waste or anything, but I did actually knit a baby hat, learn a new knitting trick, and learn how to use my new camera. So pajamas or not, that's something, right?
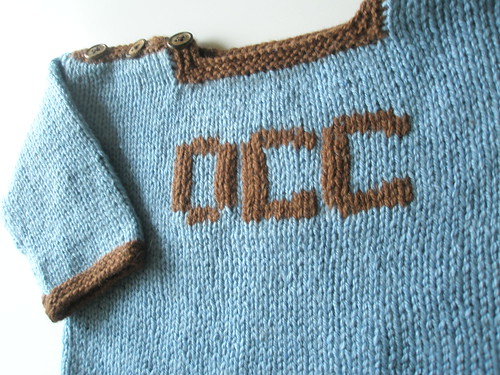
Baby O.C.C., the recipient of this sweater, is going to arrive any day now and I wanted to make him a little hat to wear home from the hospital. I used the same yarn as the sweater and whipped up this little number...
It's pretty much based on the Umbilical Cord Hat from Stitch & Bitch, but I used DK weight yarn instead of worsted so I casted on 80 stitches. Also, I inserted an extra knit row between each decrease row in the crown because I like hats when they lay more flat on the top. Oh, and I also added stripes. I used TechKnitter's Jogless Stripe tutorial to make traveling stripes, which worked shockingly well I thought.
So the new Canon Powershot Elph camera seems like its pretty great. These pictures are taken in my dining room at 11 at night, with miserable lighting, and I still got pretty good sharpness and colors. I'm excited to see how it does in better conditions.
In totally unrelated-to-knitting news, I can't resist sharing one of my favorite pictures of the weekend. On Friday night we went to the Reds game and Logan cheered his little heart out, but nine innings was just too much for him...
Being an aunt is kinda awesome.


Thursday, September 17, 2009
I'm 32, so I'm at a time in my life where everyone I know is having a baby. A friend in Philly is having a baby boy next month, so I'm sending this little sweater off tomorrow. I really, really love how it turned out!
Pattern: The Yarn Harlot's Baby Yours (Ravelry link)
Yarn: Debblie Bliss Baby Cashmerino- 2 skeins
Yarn Source: Ewe & I
Buttons: Etched shell buttons from Joann
Ewe & I, where I got the yarn for this, is just down the street from my friend Juliana, whose baby will wear this sweater. When I was visiting her there, Ewe & I was having this awesome sale where you could pop a balloon and whatever percent off it said on the paper inside is the sale you get. I got lucky and got 30% off 7 skeins of baby cashmerino!
I love the pattern, love the little buttons, and of course the cashmerino is awesome. I already have a request to make another one of these!
Part of the reason blog posts have been so scarce lately is my broken camera. I can take pictures, but I can't see what I'm doing on the LCD screen. Luckily, this will be the last post with mystery pictures because I just ordered this new camera from ebay (where it was the same price as Amazon but with free shipping and a memory card, case, and lens cleaner included). I have been swatching for my Opulent Raglan, so stay tuned!


Monday, August 17, 2009
Toronto knitting

I was in Toronto a few weeks ago for a conference and it turned out to be an excellent knitting vacation. I bought a Knit Kit at the famous Lettuce Knit and then hung out at Kensington Market for the rest of the day. I also made it out to the Beaches, where I got my hair cut on a whim and visited The Naked Sheep, which was having a 25% off-every-yarn-in-the-store sale. I got 5 gorgeous skeins of Elsebeth Silky Wool in a pretty purple to knit the Opulent Raglan. Finally! I have been looking for the perfect yarn to make that sweater forever. I passed The Purple Purl while riding the streetcar back to my hotel and hopped off to check it out. I'm so glad I did because I think it was my favorite Toronto yarn store of all. They had some SWTC Yin at 40% off, so I bought some blue and brown to make a sweater for a baby boy who will be arriving in about a month.
I decided to make a simple little sweater with the baby's initials on the front. I gave it to the parents at their baby shower last Saturday and they seemed to really like it.
Pattern: Modified version of Striped Sweater from Debbie Bliss Simply Baby
Size: 3 month size
Yarn: SWTC Yin (2 skeins Blue, 1 skein Brown)
Needles: Size 6 for body, size 4 for borders
Buttons: tiny wood ones from Joann
I had planned to use intarsia to do the letters, but it just didn't work out so I used duplicate stitch instead. The entire time I was duplicate stitching, I found myself chanting "You down with O.C.C.? Yeah you know me!"
I have another October baby to knit for, but I know just what I'm going to do. I bought some Cashmerino when I was in Philly back in June that is destined to be A Cardigan for Merry. After that, I can move on to my Opulent Raglan.


Monday, August 3, 2009
Let's be honest.
They don't all work out the way we'd like them to, do they? I hesitated to post this project because it showcases my flaws (in both my knitting and my personality) in such a spectacular way, but I figured why not be realistic. I am almost always impatient and sometimes a little lazy, and those traits have repercussions.
Pattern: Sexy Vesty (Rav link)
Yarn: Jo-Ann Dreamweave, a wool/silk blend I got on sale
Needles: 8's for the body, 7 for the armhole and neck ribbing
CanaryKnits made up this little recipe for a lacy vest and she is very clear that it is not a pattern, but more a general set of guidelines, so the pattern is not to blame for what went wrong. What went wrong is all due to me, and my problems were 5-fold:
1. As I was knitting, it seemed way too small. CanaryKnits was clear that the vest was made for a person with a 35" bust, and my bust is definitely bigger than that. I justified my decision to keep knitting because on Ravelry, someone commented that this yarn "blooms like no yarn I've seen before". So I just figured it would get bigger with blocking. Did I swatch and test this theory? Nope. I just yellled at Daisy on Daisy of Love for having such terrible taste in men and such an unscrupulous plastic surgeon.
2. Ouch. Look at those terrible seams. The thing is that despite my best efforts, I didn't make the front and back the same length at the armholes. I had a feeling I had messed this up, but I somehow ignored this feeling and kept knitting.
3. Look at those tiny armholes! The guidelines said to knit for 2 inches before binding off the top, but that just isn't enough for my arms. I tried on the vest after seaming up the shoulders and the armholes were very clearly too tight, but I somehow convinced myself that adding on the armhole ribbing would fix this. Seriously? How does that even make sense AT ALL??
4. You can't see it that well in these pictures, but the decreases at the front center are wonky as well. Somehow I picked up stitches so that the wrong side was facing me, which meant I had to use P2tog and SSPthroughbackloop to decrease. It looks ridiculous from the right side.
5. Not only is it too tight, it's also way too short. Again, my delusions about blocking led me to ignore the obvious and keep knitting.
So that's it, friends- a real UGH! to add to my Ravelry page. The sad part is that I'm so done with this project that I don't even think I'll frog it for the yarn. The yarn is soft and has a nice halo, but I hate it now because it is associated with nothing but self-contempt.
On to the next, though, right? I'm going to Toronto tomorrow and have big plans to visit all the yarn shops in the area. One of them, the Naked Sheep, is apparently having a huge sale with 25% off every yarn in the store. Can you believe my luck?
If anyone has any ideas of things to do in Toronto this weekend, I would very much appreciate it!


Tuesday, July 7, 2009
Textured Circle Shrug
I've been working on this shrug for months- I got hung up on the step where you have to pick up almost 300 stitches. I finally got back in the game when the Lion Brand blog had a knit-a-long that Stefanie Japel herself led, which inspired me to pick this up again and get going.
I have been wearing this around for about a week and just loving it, so I was really hoping to get some great pictures to show off its awesomeness. Unfortunately, our camera is on the fritz so these are going to have to do.
Pattern: Textured Circle Shrug from Stefanie Japel's Glam Knits
Size: 36-38 bust size (second-to-smallest)
Yarn: 6 skeins of Bernat Soy Natural Blends in Oatmeal
Peacock Chic, a blogger I love, always describes her projects in terms of the good, the bad, and the ugly. I am going to steal that idea to describe this.
The good:
- My friend Kris, who is fantastic in every way, brought me Glam Knits when he came to visit a few months ago. It somehow made it more fun to knit this, because it made me think of him.
- I really like how functional this piece is. I think it's going to be great for the fall; I can see myself wearing it at work all the time.
-I got this yarn on major clearance at Michael's a few years ago so I believe this shrug cost about $12. It's 50% acrylic, but the soy makes it soft and I actually kind of liked it. I decided to use it for this project because it has a nice drape and I wanted the shrug to be drapier and silkier than the one in the book. I think it worked!
The bad:
-The miles and miles of 1X1 ribbing- it was cool at first because I needed some mindless knitting in my life, but after something like 70 rounds of k1p1, with around 300 stitches per row, I was SO ready to have this finished.
-I really don't like the holes that are made by the M1P increases. I would absolutely do these differently next time.
The ugly:
-I am kind of famous for my problems understanding spatial dynamics, so it is no surprise that I wasn't thinking about how the shrug would lie on my body and ended up weaving in all the ends on the collar incorrectly. There were tons of knots in the yarn and therefore tons of ends to weave in, so when I got finished and put the thing on there were 7 different places where you could totally see the messy ends sticking out. I had to take them all out and re-weave them in on the other side of the fabric.
-These pictures are kind of ugly, too, but I went ahead and included them to show how it fits. Please ignore the strange lumps under my tank top and the weirdo look on my face.
All in all, a great project that I'm happy to have finished. I just started Sexy Vesty today and guess what? I am thick in the middle of more 1X1 ribbing!


Friday, June 12, 2009
Monster!
A little late birthday present for my nephew, who turned 1 a couple of weeks ago. One! I can hardly believe it.
Pattern: Little Monster Bear (Rav link)
Yarn: Lamb's Pride Worsted, left over from a Bengals hat I made years ago
Needles: Size 10 1/2 DPNs
Embroidery: Wonky, as usual
It took me one night to knit up all the pieces and another to sew everything together. I had to run it through the washer 3 times and I still don't feel like he felted as much as I would have liked.
As you might suspect from my two month absence from the blog, I've been in a bit of knitting slump lately. I knit this little guy in the attempt to get some mojo back, and I think it worked. I'm knitting the Textured Shrug from Glam knits and now that I've picked up all two hundred stitches, I think I'm on track. Nothing but gloriously monotonous 1X1 rib for days and days...


Thursday, April 16, 2009
Baby Hoodie
My oldest friend in the world, who I just realized I've known 25 years now, had her first baby yesterday. I haven't even seen pictures of the little guy yet, but I've been thinking about him a lot over the past couple of weeks. As I knit this sweater, I got more and more excited to meet Michel's baby. I love this kind of knitting- where every stitch just makes you happier and happier.
The pattern is the Super Easy Baby Cardigan. I picked up stitches for the button band instead of just knitting garter stitch on the edges. Instead of knitting into the front and back of every stitch for the raglan, I did matching M1 increases. I also used a provisional cast on at the very beginning so I could use the 3 needle bind off for the hood. I'm glad- it was super easy and I think it looks more polished (because as always, my seaming is eh.)
The yarn is Cotton-Ease- one skein of Stone covered everything but the second sleeve (I had to go buy another skein for that darn thing). I used a bit of a skein of Charcoal for the borders. Buttons are simple wood ones from Joann (50% off- woot!).


Monday, March 30, 2009
Starburst Mirror Sculpture
When we moved into the new house, I had resolved to blog about some of the renovations and other fun stuff we planned to do. Unfortunately, the renovations haven't happened as quickly as we had hoped so I haven't had much to report. But a few weeks ago, some fabulous Miami friends came to visit and I had to spiff the place up a bit so they wouldn't be appalled at my lack of style.
Our house is older and has some neat little features, like these little lamps that are above the fireplace. Unfortunately, we've been living with a big blank space between the little lamps ever since we moved in. I always see these cool looking starburst mirror wall hanging things at Crate and Barrel and other fun places and have always thought they would be perfect for that space. Unfortunately, they are usually kind of expensive (that one at Crate & Barrel is $200!). So when I saw on the CRAFT blog a DIY tutorial, I knew I had the perfect fix.
I did a little further searching on the Internet and used two tutorials for inspiration: one from Apartment Therapy and one from Instructables. I got everything I needed from Michael's, Wal-Mart, & Home Depot:
Glue gun, glue sticks, bamboo skewers, wooden dowels, silver spray paint, silver regular paint, a paintbrush, 2 packs of assorted sized circle mirrors from Michael's (50 total), an auto rearview mirror from Wal-Mart, and 2 circles cut out of carboard.
I forget how much I paid for everything individually, but all together I believe it was under $20.
All of that turned into this:
I'm really happy with the finished product, but I want to tell you about what I did wrong in case you decide to do this. First of all, I bought 4 long wooden dowels from Home Depot, spray painted them silver, and then cut them into smaller 12" sections. That was dumb, because the sawed off part was all raw and ugly and unpainted. So I had to use sandpaper to sand them down until they looked nice and then I had to hand paint silver onto the ends.
Next, I think I bought a slightly too small auto rearview mirror. Originally, the plastic ring around the mirror was black plastic. After I had already assembled the whole mirror I realized that the black plastic didn't look right. But at this point, I already had the starburst hanging on the wall, so I had to get up on a chair and paint the black border by hand with silver paint. I like the look a lot more, but in the future I would paint the center mirror FIRST.
But even with the mishaps, this project was not too time intensive and I really like the results. Now that big blank spot between the retro lamps if filled, and I feel really thrifty and creative every time I look there. Definitely a win!


Sunday, March 22, 2009
Goth Socks
Finally I have some knitting to show you! As soon as I saw Cookie A.'s Marlene Socks in Knit.1, I knew I would be making them for myself. I got some Dream in Color Smooshy in Gothic Rose on sale from Sonny and Shear and started these socks right after the holidays. They have taken forever because I've been making mistakes and have frogged at least part of them about 8 times. But it is worth it because these are definitely my favorite socks ever.
Look at this pattern! It is fantastic. All those twisted stitches make these gorgeous lines and the heels and toes flow so perfectly from the foot.
All the ribbing makes them fit really well, too. I love them!
So I need to get started ASAP on a gift for my oldest friend's baby, due in early April. The little one will be living in Philly, so I think I'm going to do a little cotton sweater for spring.


Sunday, March 8, 2009
Finally- the mystery present!
Several astute readers have asked me about the picture on my sidebar of Jason's Christmas Present. In lieu of an FO picture, I just had a picture of my brother-in-law. I had to do that because Jason is super sneaky and joined Ravelry over the holidays so he could try to find out what I was knitting him for Christmas.
Jason is super supportive of my knitting habit- he hand picks yarn for my birthdays and finds knitting books that he thinks I will enjoy. He once told me, when watching me knit a pair of socks, "so basically that heel is a series of short rows, right?" Seriously! He's just the type of person to look up how to knit socks because I am knitting them, even though he has no previous interest in knitting.
So that kind of interest warrants a nice pair of handknit socks, right? I searched for a pattern that was not too crazy, but had just a little something to keep it interesting. I found Mr. Pitts socks, which fit the bill nicely. I used some Patons Kroy Sock Yarn that I found on sale the day after Thanksgiving. I think Kroy sock yarn is one of the most underrated sock yarns out there- it's not indie, but it feel great and you can't beat the value.
I looked up Jason's foot size online and made the socks as long as recommended according to some random sock length chart, but it turns out I was totally wrong. The socks were way too long. So after Christmas I took the socks back, frogged the toe and about 15 rows on the foot, and reknit the toe. Now they fit nicely. I think Jason really likes them, and he is a seriously deserving recipient of quality handknits.
I took these pictures tonight after spending the day sewing with my sister. Today we decided to mix sewing and embroidery and make these wacky little monsters. They are made of fleece, with felt for the eyes and mouth. We embroidered the faces, using french knots for the eyes and satin stitch for the teeth.
Aren't these guys fun? I'm going to send my monster (the one on the right) to my oldest friend Michel, who is set to have a baby in early April. Stay tuned- Michel's new baby definitely will have a knitted present, too!


Sunday, March 1, 2009
Pillows and Totes
Despite Nico's reckless disregard for my crafty efforts, I decided to try again. I made her a fleece pillow, mostly so she would have an alternative to my couch pillow. I even used the project as an opportunity to get a little embroidery practice. It worked well, but of course she started tearing it about 2.2 seconds after she discovered it was there. It's okay, though- she loves it.
My sister and I spent Saturday making tote bags from the Sew Fast Sew Easy book. It was great- we got the fabric from Joann and recycled a sheet for the lining. We estimate that we made them for about $3 each!
We used fusible interfacing for the first time, so the bags are really sturdy.
They also have this hanging pocket on the inside, which was totally worth the extra effort. I really think I'm going to use this all the time. I mean, look at how much it will hold!


Sunday, February 22, 2009
Introducing Nico
I never thought it would happen, but we got a dog. A tiny 5 month old pomeranian/sheltie mix we named Nico. Because she's only 3 lbs. and it is freezing outside here now, I made her a sweater. Well, also because the way I celebrate things is by knitting something.
Pattern: Dogcoat from Garnstudio
Needles: Size 7
Yarn: Knitpicks Swish Worsted
The pattern is great- it's worked mostly in the round and has these delicious cables all over it. It took about 5 days, but the process was fun. More time intensive than most dog sweaters, but the cabley goodness is worth it.
The only negative about the sweater is that it's difficult to get on the dog. It is a turtleneck, for one, and even after you get her head in, you have to wrestle her legs into the sleeves. She doesn't seem to mind the sweater once it's on, but getting it on is not her favorite activity.
Nico herself is something else. She is sweet and lovey, but playful and energetic too.
Okay, you're not going to believe this, but as I type, she just trotted into the room with the sweater in her mouth. She was wearing it five minutes ago when I came upstairs to type this, but that little monkey somehow managed to chew it off. It's pretty much destroyed. These pictures officially show the first and last time Nico wears a sweater.


Friday, February 13, 2009
Bamboo Bear
A friend from Miami recently had a beautiful baby girl and I knew I wanted to send a care package down, but it's always difficult to decide what to make for warm weather babies. They just don't need sweaters, hats, or blankets the way that cold weather babies do. Every baby needs a teddy bear, though, right?
Pattern: Harry Bear pattern from Berroco (Free!)
Yarn: Bamboospun from Hobby Lobby (held doubled). (On sale for $2.50 per skein)
Needles: Size 10
Ribbon: 4 yd spool from Michael's ($1)
Total cost: $6
I know people hate talking about money and think it's super tacky to add up the total cost of things, but I am one of those people who, when complimented on a shirt, says "Thank you! I got in on sale at TJ Maxx for 7 bucks!" So when I can make a baby gift with this level of adorable for $6, I feel the need to share.
I recently went to a Hobby Lobby for the first time and was very impressed with their yarn selection- lots of natural fiber stuff and sock yarn. This Bamboo Spun is 77% Bamboo, 23% Nylon and only $2.50 for 148 yds. I could make another bear with my leftover yarn, which makes the total cost of the project even lower!
Bamboo Bear ponders the economic crisis while staring out onto the hills of Cincinnati...
This pattern is super cute, especially with yarns that are a little fuzzy or plushy. As cute as it is though, I would only knit it again if I rewrote the directions for working in the round. Seaming this little thing took as long as knitting it- seriously. As always, my seaming leaves a lot to be desired, but luckily this yarn hides lots of mistakes.
I actually started making a sweater for Bamboo Bear, but it just wasn't turning out right and it was covering his little belly, which is one of his best features. Then I started knitting him a little scarf, but I ran out of scrap sock yarn before it was long enough. I wasn't sure I liked it anyway. I decided to just go for the simple ribbon because Bamboo Bear is going to live in Miami anyway. Most people down there wear the equivalent of this ribbon as on-the-town attire.
I'm sure everyone is sick to death of me complaining about how I don't know how to embroider, so I won't go into it again. I did get the Stitch It Kit for Christmas, but I haven't taken the time to really learn yet. Too much apron making and knitting and, um, having a job and stuff.


